卸载mariadb
# 查看是否安装mariadb
rpm -qa|grep mariadb

# 卸载
rpm -e --nodeps 文件名
下载MySQL安装包
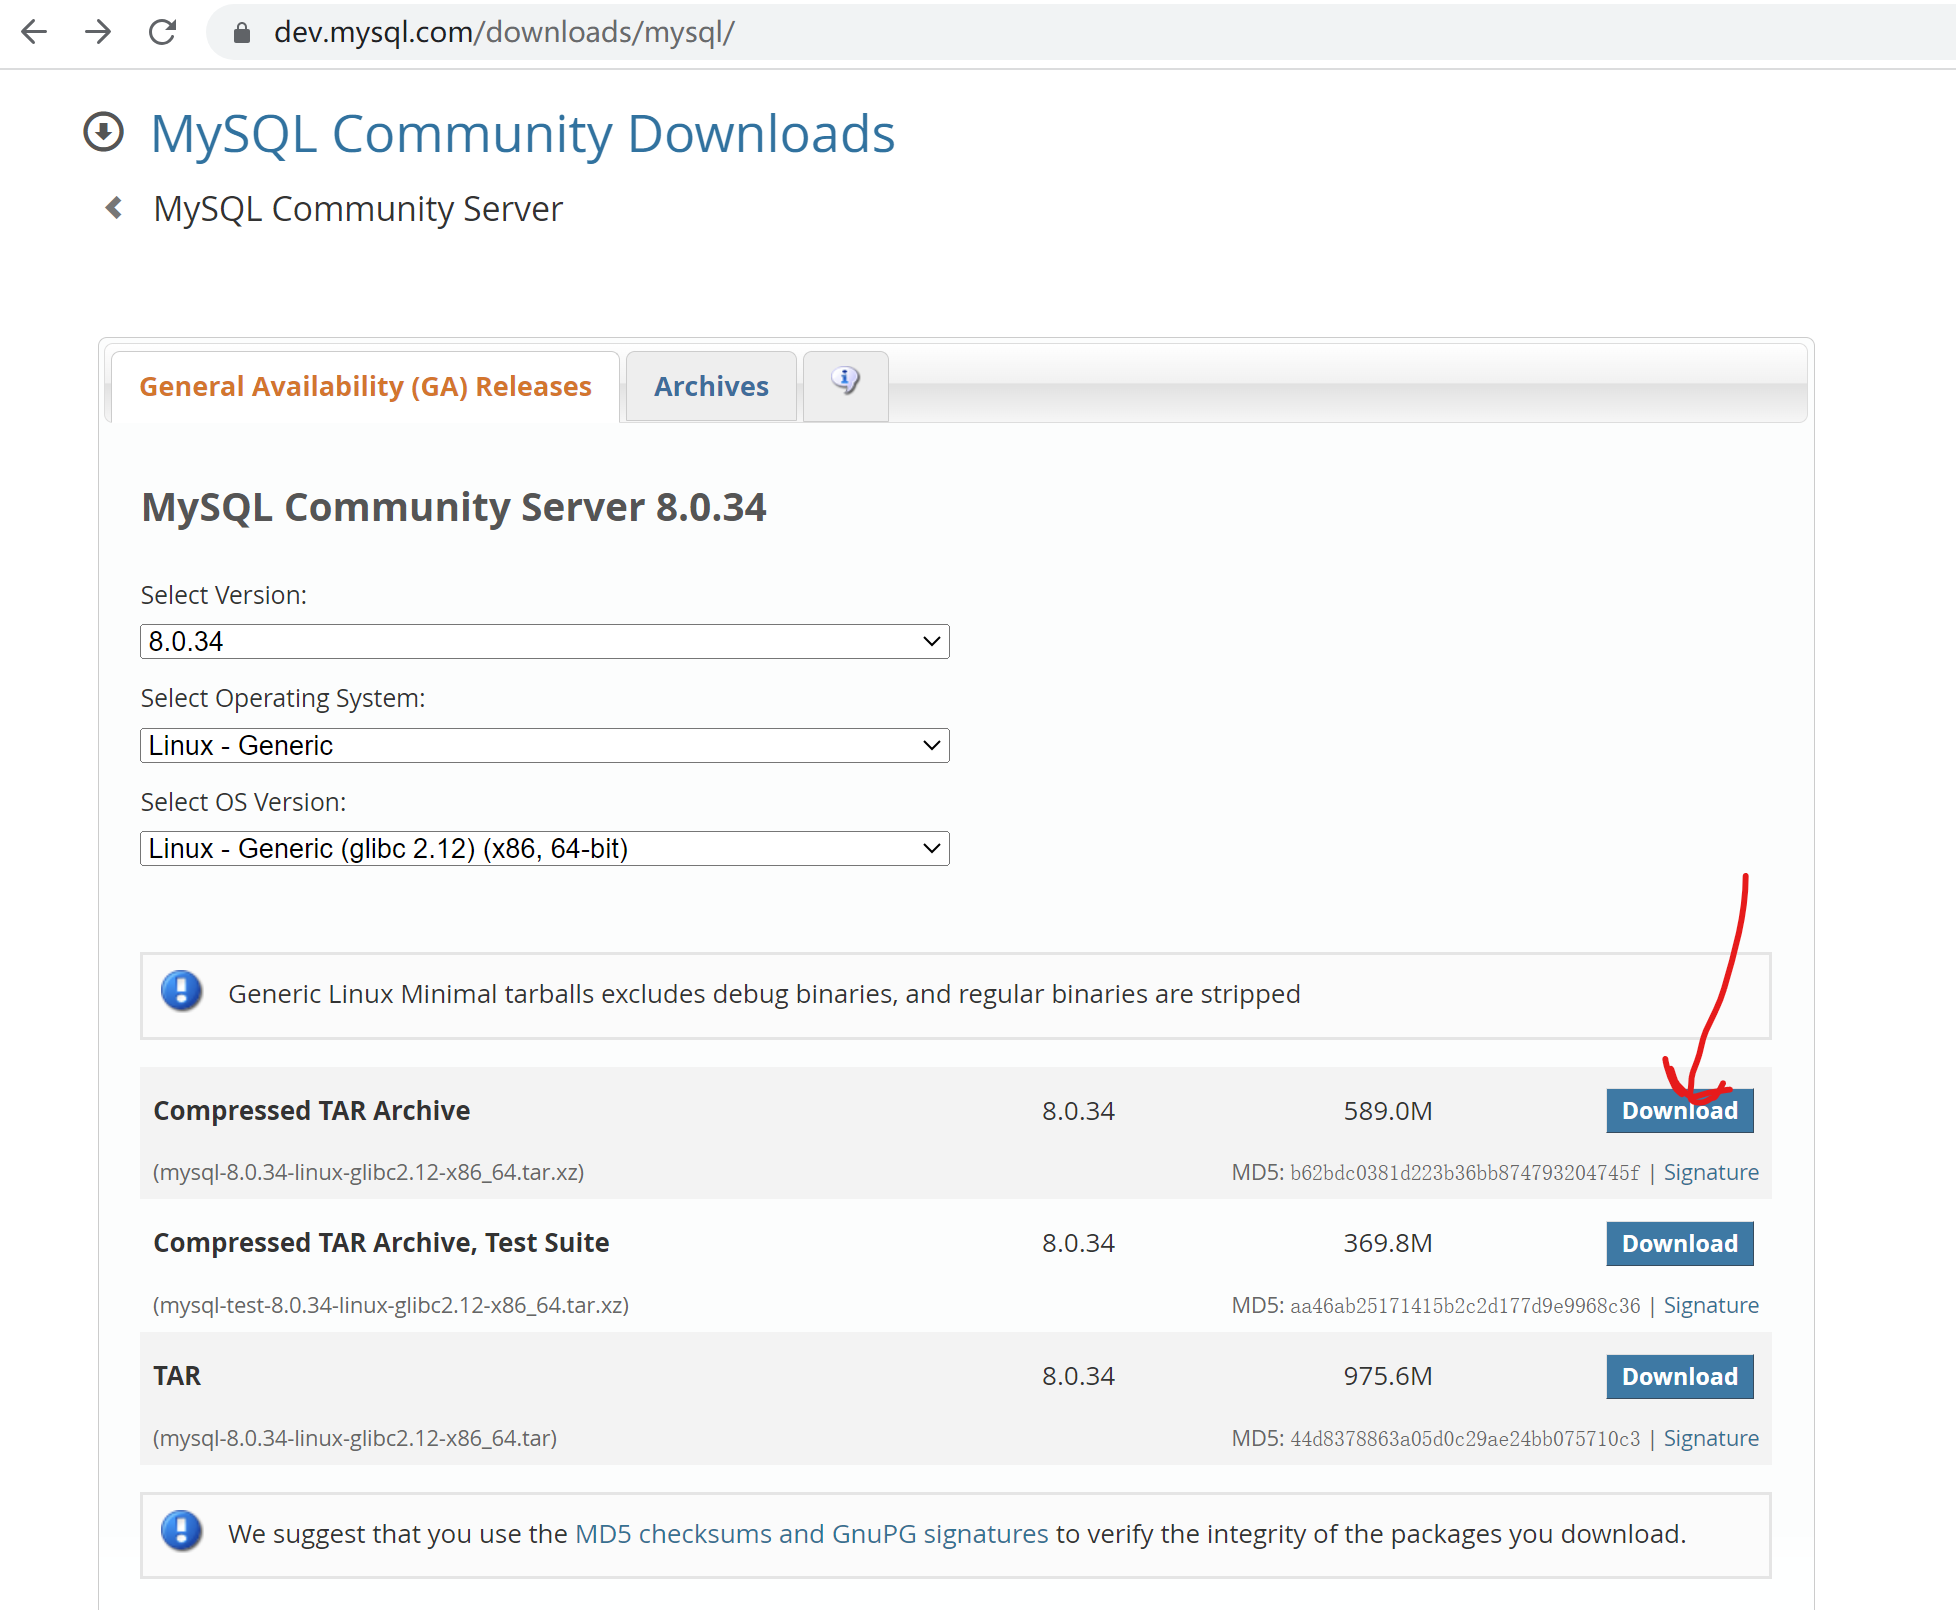
下载完后通过Xftp上传到Linux服务器
如果你的服务器联网,可以直接通过wget命令下载
wget https://cdn.mysql.com//Downloads/MySQL-8.0/mysql-8.0.34-linux-glibc2.12-x86_64.tar.xz
这里我直接用命令下载了
#进入到/usr/local目录下
[root@centos home]# cd /usr/local/
[root@centos local]# ls
bin  etc  games  include  lib  lib64  libexec  sbin  share  src

#下载MySQL安装包
[root@centos local]# wget https://cdn.mysql.com//Downloads/MySQL-8.0/mysql-8.0.34-linux-glibc2.12-x86_64.tar.xz

#下载需要一定时间,下载完后的情况如下
[root@centos local]# wget https://cdn.mysql.com//Downloads/MySQL-8.0/mysql-8.0.34-linux-glibc2.12-x86_64.tar.xz
--2023-07-25 14:34:07--  https://cdn.mysql.com//Downloads/MySQL-8.0/mysql-8.0.34-linux-glibc2.12-x86_64.tar.gz
正在解析主机 cdn.mysql.com (cdn.mysql.com)... 23.203.29.47
正在连接 cdn.mysql.com (cdn.mysql.com)|23.203.29.47|:443... 已连接。
已发出 HTTP 请求,正在等待回应... 200 OK
长度:545000093 (520M) [application/x-tar-gz]
正在保存至: “mysql-8.0.34-linux-glibc2.12-x86_64.tar.xz”

100%[=========================================================================================================>] 545,000,093 3.34MB/s 用时 3m 21s

2023-07-25 14:37:29 (2.58 MB/s) - 已保存 “mysql-8.0.34-linux-glibc2.12-x86_64.tar.xz” [545000093/545000093])
查看下载的文件
[root@centos local]# ls
bin  etc  games  include  lib  lib64  libexec  mysql-8.0.34-linux-glibc2.12-x86_64.tar.xz  sbin  share  src
安装准备
解压MySQL安装包
#解压安装包
[root@centos local]# tar xvJf mysql-8.0.34-linux-glibc2.28-x86_64.tar.zx

#查看解压后生成了一个叫mysql-8.0.34-linux-glibc2.12-x86_64的目录
[root@centos local]# ll
总用量 532228
drwxr-xr-x. 2 root root         6 4月  11 2018 bin
drwxr-xr-x. 2 root root         6 4月  11 2018 etc
drwxr-xr-x. 2 root root         6 4月  11 2018 games
drwxr-xr-x. 2 root root         6 4月  11 2018 include
drwxr-xr-x. 2 root root         6 4月  11 2018 lib
drwxr-xr-x. 2 root root         6 4月  11 2018 lib64
drwxr-xr-x. 2 root root         6 4月  11 2018 libexec
drwxr-xr-x. 9 root root       129 7月  25 14:44 mysql-8.0.34-linux-glibc2.12-x86_64
-rw-r--r--. 1 root root 545000093 6月  22 18:26 mysql-8.0.34-linux-glibc2.12-x86_64.tar.zx
drwxr-xr-x. 2 root root         6 4月  11 2018 sbin
drwxr-xr-x. 5 root root        49 7月  17 09:51 share
drwxr-xr-x. 2 root root         6 4月  11 2018 src
重命名
默认解压出来的目录名字太长了,重命名一下
[root@centos local]# mv mysql-8.0.34-linux-glibc2.12-x86_64 mysql-8
[root@centos local]# ll
总用量 532228
drwxr-xr-x. 2 root root         6 4月  11 2018 bin
drwxr-xr-x. 2 root root         6 4月  11 2018 etc
drwxr-xr-x. 2 root root         6 4月  11 2018 games
drwxr-xr-x. 2 root root         6 4月  11 2018 include
drwxr-xr-x. 2 root root         6 4月  11 2018 lib
drwxr-xr-x. 2 root root         6 4月  11 2018 lib64
drwxr-xr-x. 2 root root         6 4月  11 2018 libexec
drwxr-xr-x. 9 root root       129 7月  25 14:44 mysql-8
-rw-r--r--. 1 root root 545000093 6月  22 18:26 mysql-8.0.34-linux-glibc2.12-x86_64.tar.zx
drwxr-xr-x. 2 root root         6 4月  11 2018 sbin
drwxr-xr-x. 5 root root        49 7月  17 09:51 share
drwxr-xr-x. 2 root root         6 4月  11 2018 src

#这个时候安装的压缩包其实可以删除了
[root@centos local]# rm -rf mysql-8.0.34-linux-glibc2.12-x86_64.tar.zx
创建数据目录
在mysql-8目录下创建一个data的目录,该目录主要存放MySQL的数据文件
[root@centos local]# cd mysql-8/
[root@centos mysql-8]# mkdir data
#第二行的data就是我们自己创建的data目录
[root@centos mysql-8]# ll
总用量 288
drwxr-xr-x.  2 7161 31415   4096 6月  22 20:25 bin
drwxr-xr-x.  2 root root       6 7月  25 14:53 data
drwxr-xr-x.  2 7161 31415     38 6月  22 20:25 docs
drwxr-xr-x.  3 7161 31415    282 6月  22 20:25 include
drwxr-xr-x.  6 7161 31415    201 6月  22 20:25 lib
-rw-r--r--.  1 7161 31415 279815 6月  22 19:07 LICENSE
drwxr-xr-x.  4 7161 31415     30 6月  22 20:25 man
-rw-r--r--.  1 7161 31415    666 6月  22 19:07 README
drwxr-xr-x. 28 7161 31415   4096 6月  22 20:25 share
drwxr-xr-x.  2 7161 31415     77 6月  22 20:25 support-files
设置用户组并赋权
创建用户组mysql
[root@centos mysql-8]# groupadd mysql创建用户mysql并指定用户组mysql
[root@centos mysql-8]# useradd -r -g mysql mysql修改/usr/local/mysql-8目录的属主和属组
[root@centos mysql-8]# chown -R mysql:mysql /usr/local/mysql-8/
[root@centos mysql-8]# ll
总用量 288
drwxr-xr-x.  2 mysql mysql   4096 6月  22 20:25 bin
drwxr-xr-x.  2 mysql mysql      6 7月  25 14:53 data
drwxr-xr-x.  2 mysql mysql     38 6月  22 20:25 docs
drwxr-xr-x.  3 mysql mysql    282 6月  22 20:25 include
drwxr-xr-x.  6 mysql mysql    201 6月  22 20:25 lib
-rw-r--r--.  1 mysql mysql 279815 6月  22 19:07 LICENSE
drwxr-xr-x.  4 mysql mysql     30 6月  22 20:25 man
-rw-r--r--.  1 mysql mysql    666 6月  22 19:07 README
drwxr-xr-x. 28 mysql mysql   4096 6月  22 20:25 share
drwxr-xr-x.  2 mysql mysql     77 6月  22 20:25 support-files
更改权限
[root@centos local]# chmod -R 755 /usr/local/mysql-8/初始化MySQL
[root@centos bin]# cd /usr/local/mysql-8/bin/
[root@centos bin]# ./mysqld --initialize --user=mysql --datadir=/usr/local/mysql-8/data --basedir=/usr/local/mysql-8
2023-07-25T07:57:48.872161Z 0 [Warning] [MY-011070] [Server] 'Disabling symbolic links using --skip-symbolic-links (or equivalent) is the default. Consider not using this option as it' is deprecated and will be removed in a future release.
2023-07-25T07:57:48.872248Z 0 [System] [MY-013169] [Server] /usr/local/mysql-8/bin/mysqld (mysqld 8.0.34) initializing of server in progress as process 7093
2023-07-25T07:57:48.877729Z 1 [System] [MY-013576] [InnoDB] InnoDB initialization has started.
2023-07-25T07:57:49.096083Z 1 [System] [MY-013577] [InnoDB] InnoDB initialization has ended.
2023-07-25T07:57:50.294255Z 6 [Note] [MY-010454] [Server] A temporary password is generated for root@localhost: UFV9+HM1k&f4
UFV9+HM1k&f4 为MySQL的初始密码
修改my.cnf配置文件
[root@centos bin]# vim /etc/my.cnf复制如下
[mysqld]
# 设置3306端口
port=3306
# 设置mysql的安装目录
basedir=/usr/local/mysql-8
# 设置mysql数据库的数据的存放目录
datadir=/usr/local/mysql-8/data
# 允许最大连接数
max_connections=1000
# 允许连接失败的次数。这是为了防止有人从该主机试图攻击数据库系统
max_connect_errors=100
# 服务端使用的字符集默认为UTF8
character-set-server=utf8mb4
# 创建新表时将使用的默认存储引擎
default-storage-engine=INNODB
# 默认使用“mysql_native_password”插件认证
default_authentication_plugin=mysql_native_password
#MySQL连接闲置超过一定时间后(单位:秒)将会被强行关闭
#MySQL默认的wait_timeout  值为8个小时, interactive_timeout参数需要同时配置才能生效
interactive_timeout = 1800
wait_timeout = 1800
#Metadata Lock最大时长(秒), 一般用于控制 alter操作的最大时长sine mysql5.6
#执行 DML操作时除了增加innodb事务锁外还增加Metadata Lock,其他alter(DDL)session将阻塞
lock_wait_timeout = 3600
#内部内存临时表的最大值。
#比如大数据量的group by ,order by时可能用到临时表,
#超过了这个值将写入磁盘,系统IO压力增大
tmp_table_size = 64M
max_heap_table_size = 64M
[mysql]
# 设置mysql客户端默认字符集
default-character-set=utf8mb4
[client]
# 设置mysql客户端连接服务端时默认使用的端口
port=3306
default-character-set=utf8mb4
配置后修改 /etc/my.cnf 的权限为755
[root@centos bin]# chmod 755 /etc/my.cnf启动MySQL
[root@centos mysql-8]# /usr/local/mysql-8/support-files/mysql.server start
Starting MySQL.. SUCCESS!
设置软连接
[root@centos mysql-8]# ln -s /usr/local/mysql-8/support-files/mysql.server /etc/init.d/mysql
[root@centos mysql-8]# ln -s /usr/local/mysql-8/bin/mysql /usr/bin/mysql
[root@centos mysql-8]# ln -s /usr/local/mysql-8/mysql.sock /var/mysql.sock
[root@centos mysql-8]# service mysql restart
Shutting down MySQL. SUCCESS!
Starting MySQL.. SUCCESS!
进入MySQL
# 密码是上面初始化时候的密码
[root@centos mysql-8]# mysql -uroot -p
Enter password:

[root@centos mysql-8]# mysql -uroot -p
Enter password:
Welcome to the MySQL monitor.  Commands end with ; or \g.
Your MySQL connection id is 8
Server version: 8.0.34

Copyright (c) 2000, 2023, Oracle and/or its affiliates.

Oracle is a registered trademark of Oracle Corporation and/or its
affiliates. Other names may be trademarks of their respective
owners.

Type 'help;' or '\h' for help. Type '\c' to clear the current input statement.

mysql>
修改密码
mysql> set password for root@localhost = 'root';
Query OK, 0 rows affected (0.01 sec)
#或者
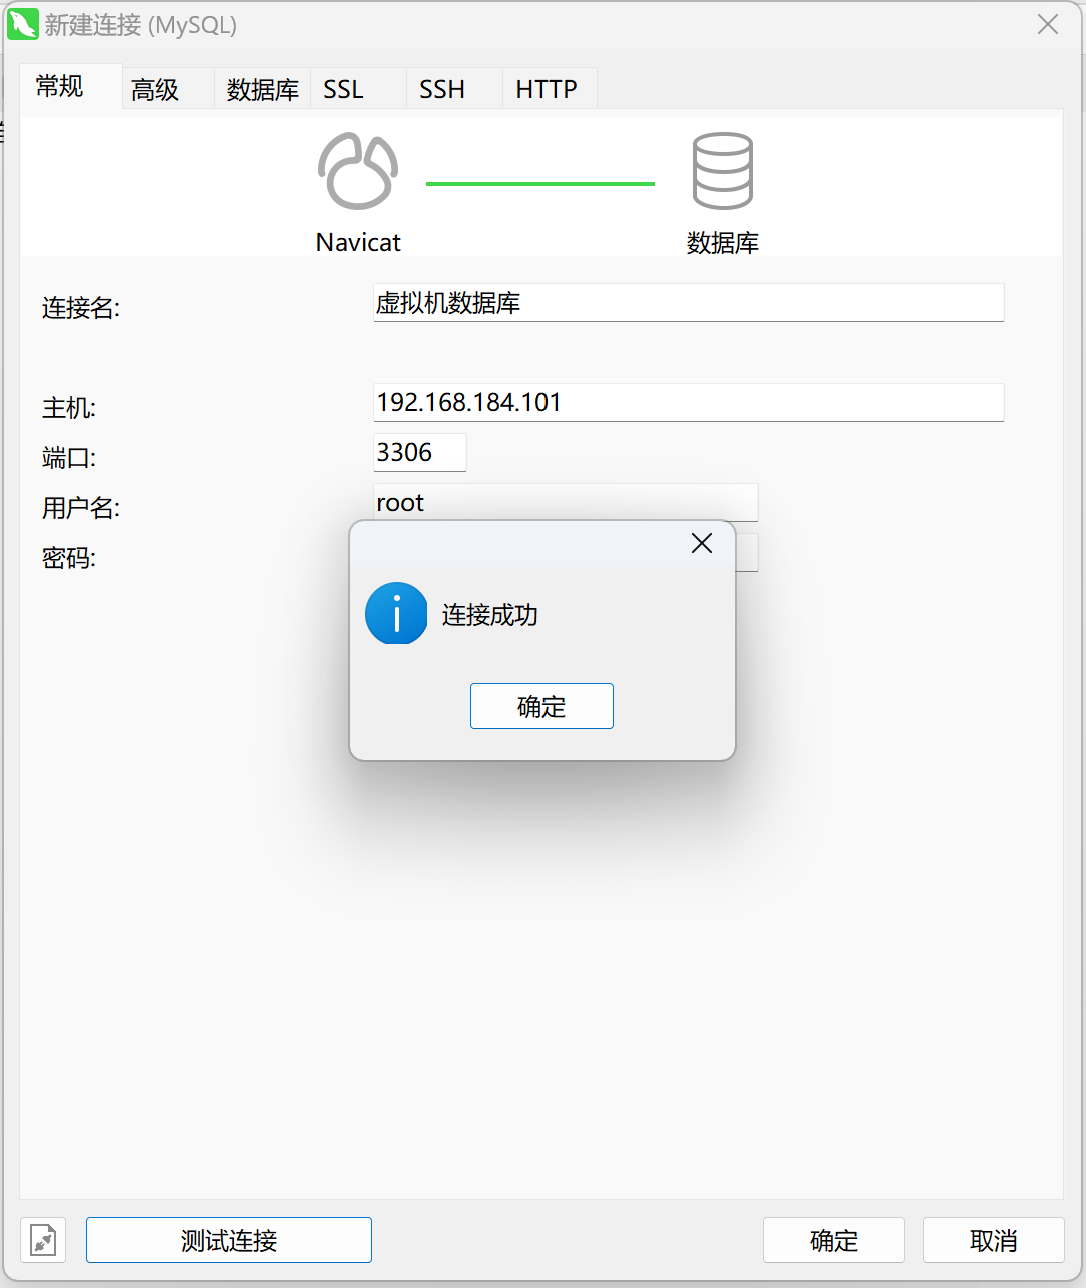
ALTER USER 'root'@'%' IDENTIFIED WITH mysql_native_password BY '123456';设置远程访问
设置远程访问,默认情况下MySQL只能本地访问,远程无法访问,即其它机器无法连接MySQL
mysql>use mysql;
msyql>update user set user.Host='%' where user.User='root';
mysql>flush privileges;    //刷新权限
注意:防火墙要开放3306端口
开机自启
#将服务文件拷贝到 /etc/init.d下,并重命名为mysqld
[root@centos mysql-8]# cp /usr/local/mysql-8/support-files/mysql.server /etc/init.d/mysqld
#赋予可执行权限
[root@centos mysql-8]# chmod +x /etc/init.d/mysqld
#添加服务
[root@centos mysql-8]# chkconfig --add mysqld
#显示服务列表,如果看到mysqld的服务,并且3,4,5都是on的话则成功,如果是off,则执行chkconfig --level 345 mysqld on
[root@centos mysql-8]# chkconfig --list

注:该输出结果只显示 SysV 服务,并不包含
原生 systemd 服务。SysV 配置数据
可能被原生 systemd 配置覆盖。

      要列出 systemd 服务,请执行 'systemctl list-unit-files'。
      查看在具体 target 启用的服务请执行
      'systemctl list-dependencies [target]'。

mysqld         	0:关	1:关	2:开	3:开	4:开	5:开	6:关
netconsole     	0:关	1:关	2:关	3:关	4:关	5:关	6:关
network        	0:关	1:关	2:开	3:开	4:开	5:开	6:关